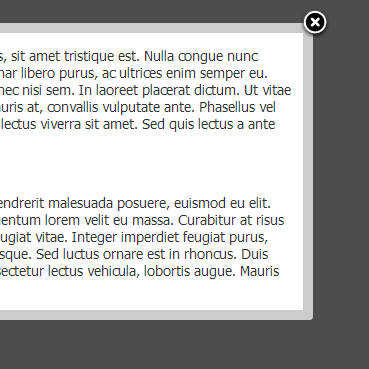
Web developers at times need to display some information to the users via a means of a popup. Clearly, the regular popups don’t look professional at all. Thus, to create professional looking stylish popups was a demand for the web developers. Hence, jQuery popups came into being. These popups don’t open any new window or tab in the users browser. It just creates a popup, which is displayed on the same page and does not look annoying.
Well, all that being said, you can go ahead and have a look at a sample jQuery popup, and also you can download the entire source code if you wish.
Without saying more theoretical stuff, let’s get started in creating our jQuery popup menu.
Creating a jQuery Popup menu
- Create a new HTML page, or use your current one if you wish. In the new page, paste the following lines of code in the newly created HTML page.
<html>
  <head>
    <title>Creating jQuery Popup</title>
    <link href="style.css" rel="stylesheet" type="text/css" media="all" />
    <script
      type="text/javascript"
      src="http://ajax.googleapis.com/ajax/libs/jquery/1.9.0/jquery.min.js"
    ></script>
    <script type="text/javascript" src="script.js"></script>
  </head>

  <body>
    <a href="#" class="popup">Click Here to Create a Popup</a>

    <div id="Popup">
      <div class="close"></div>
      <span class="popup_tooltip"
        >Press Esc to close <span class="arrow"></span
      ></span>
      <div id="popup_content">
        <p>
          Lorem ipsum dolor sit amet, consectetur adipiscing elit. Morbi non
          vehicula tellus, sit amet tristique est. Nulla congue nunc non arcu
          dictum, at egestas sapien ornare. Aliquam erat volutpat. Aliquam
          pulvinar libero purus, ac ultrices enim semper eu. Maecenas pharetra
          mi quis nisi ultricies iaculis. Etiam at gravida neque. Aliquam nec
          nisi sem. In laoreet placerat dictum. Ut vitae nulla at eros ultrices
          elementum et nec leo. Donec purus augue, ultricies non mauris at,
          convallis vulputate ante. Phasellus vel volutpat velit, eget dignissim
          ipsum. Praesent commodo lacinia turpis, et cursus lectus viverra sit
          amet. Sed quis lectus a ante varius vehicula fringilla in turpis.
          Vestibulum ac convallis nisl.
        </p>
        <br />
        <p>
          Suspendisse lobortis ante vitae tincidunt lacinia. Aenean lectus
          augue, fringilla hendrerit malesuada posuere, euismod eu elit. Donec
          suscipit, lorem non scelerisque sollicitudin, diam est luctus urna,
          sed elementum lorem velit eu massa. Curabitur at risus lobortis,
          sagittis nisi et, sagittis nunc. Donec cursus neque sem, nec lacinia
          elit feugiat vitae. Integer imperdiet feugiat purus, rhoncus dictum
          metus lacinia a. Quisque tempor lectus convallis tincidunt
          scelerisque. Sed luctus ornare est in rhoncus. Duis interdum rutrum
          justo, a adipiscing tellus imperdiet a. In eu tellus vehicula,
          consectetur lectus vehicula, lobortis augue. Mauris elementum dui id
          nunc feugiat porta.
        </p>
      </div>
    </div>

    <div class="loader"></div>
    <div id="backgroundPopup"></div>
  </body>
</html>
- Next, we will create the style sheet for the page. In the style sheet, we will define the div element to be hidden on the main page. But we will display the contents of the div element when the user clicks on a link. Name the style sheet : style.css
/*
 Stylesheet by Aneesh Bhatnagar
 Website: www.slashcoding.com
*/

#backgroundPopup {
  z-index: 1;
  position: fixed;
  display: none;
  height: 100%;
  width: 100%;
  background: #000000;
  top: 0px;
  left: 0px;
}
#Popup {
  font-family: "lucida grande", tahoma, verdana, arial, sans-serif;
  background: none repeat scroll 0 0 #ffffff;
  border: 10px solid #ccc;
  border-radius: 3px 3px 3px 3px;
  color: #333333;
  display: none;
  font-size: 14px;
  left: 50%;
  margin-left: -402px;
  position: fixed;
  top: 20%;
  width: 800px;
  z-index: 2;
}
div.loader {
  background: url("img/loading.gif") no-repeat scroll 0 0 transparent;
  height: 32px;
  width: 32px;
  display: none;
  z-index: 9999;
  top: 40%;
  left: 50%;
  position: absolute;
  margin-left: -10px;
}
div.close {
  background: url("img/closebox.png") no-repeat scroll 0 0 transparent;
  bottom: 24px;
  cursor: pointer;
  float: right;
  height: 30px;
  left: 27px;
  position: relative;
  width: 30px;
}
span.popup_tooltip {
  background: none repeat scroll 0 0 #000000;
  border-radius: 2px 2px 2px 2px;
  color: #ffffff;
  display: none;
  font-size: 11px;
  height: 16px;
  opacity: 0.7;
  padding: 4px 3px 2px 5px;
  position: absolute;
  right: -62px;
  text-align: center;
  top: -51px;
  width: 93px;
}
span.arrow {
  border-left: 5px solid transparent;
  border-right: 5px solid transparent;
  border-top: 7px solid #000000;
  display: block;
  height: 1px;
  left: 40px;
  position: relative;
  top: 3px;
  width: 1px;
}
div#popup_content {
  margin: 4px 7px;
}
- In the style sheet above, I have used two images. You can download these images from below and then save them in a folder called img in the same place as your other files.
- Next, we need to create the JavaScript file, which will hold our jQuery script for the popup to work. Create a new file and name it _script.js. _Place the following lines of code in that file.
jQuery(function ($) {
  $("a.popup").click(function () {
    loading();
    setTimeout(function () {
      loadPopup();
    }, 500);
    return false;
  });

  $("div.close").hover(
    function () {
      $("span.popup_tooltip").show();
    },
    function () {
      $("span.popup_tooltip").hide();
    }
  );

  $("div.close").click(function () {
    disablePopup();
  });

  $(this).keyup(function (event) {
    if (event.which == 27) {
      disablePopup();
    }
  });

  $("div#backgroundPopup").click(function () {
    disablePopup();
  });

  function loading() {
    $("div.loader").show();
  }
  function closeloading() {
    $("div.loader").fadeOut("normal");
  }

  var popupStatus = 0;

  function loadPopup() {
    if (popupStatus == 0) {
      closeloading();
      $("#Popup").fadeIn(0500);
      $("#backgroundPopup").css("opacity", "0.7");
      $("#backgroundPopup").fadeIn(0001);
      popupStatus = 1;
    }
  }

  function disablePopup() {
    if (popupStatus == 1) {
      $("#Popup").fadeOut("normal");
      $("#backgroundPopup").fadeOut("normal");
      popupStatus = 0;
    }
  }
});
Let me explain you the code that we have just written in brief. Basically we trigger the loading function in the HTML. This function then creates a delay of 0.5 seconds and then the loadPopup function is triggered. This function then displays the content of the popup.
- Well, that’s it. You just made a popup window on your webpage using jQuery and CSS.
I hope this tutorial helped you create something useful for your website or blog. If you face any problems, be free to contact me using the Contact page or by commenting below. Also, don’t forget to subscribe to Slash Coding for latest post updates via RSS Feeds, Facebook, Google+ or Twitter.
