I can bet that you have seen a tooltip on almost every page that you visit. Web developers may know this by the name of a** _title attribute _for an element**. The value for the title is displayed as a tooltip on HTML browsers. For instance, if you hover on any image on Slash Coding, you will see what the image is in the form of a simple tooltip. But today, I will provide you a simple guide which will help you create a customized, stylish jQuery tooltip using a jQuery plugin. You may hover on this image, and you will get a simple HTML tooltip showing you the title of that image.
If you are reading this article, chances are that you are interested in jQuery. You might want to try the following tutorials as well.
- Learn how to create a Sticky Menu using jQuery
- Learn how to create a custom Content scroller using jQuery
- Create a jQuery based full page loading animation
Now, without wasting any time, let’s get started with the tutorial.
HTML Part
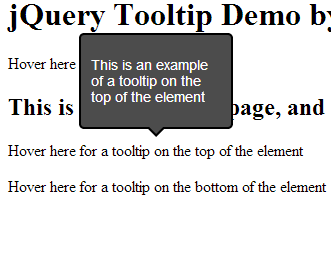
In the HTML part, we just need to create a mock-up page which will display the jQuery tooltip when hovered on. For this, I will create 2 different span tags, that will show a tooltip at the top and bottom respectively. To do that, create a new page and paste the following contents on to that page.
<html>
  <head>
    <title>jQuery tooltip by Slash Coding</title>
  </head>
  <body>
    <h1>jQuery Tooltip Demo by Slash Coding</h1>
    <span title="This is a normal tooltip"
      >Hover here for a simple Tooltip</span
    >
    <h2>
      This is an interesting page, and here we will learn how to create a jQuery
      customized tooltip for our text.
    </h2>
    <p>
      <span id="top-tooltip"
        >Hover here for a tooltip on the top of the element</span
      >
    </p>
    <p>
      <span id="bottom-tooltip"
        >Hover here for a tooltip on the bottom of the element</span
      >
    </p>
  </body>
</html>
CSS Part
For the CSS part, I am not going to style the webpage we just created, but we need to import the CSS for the jQuery tooltip plugin. For doing that, head over to the official plugin webpage and download the package. When you download it, extract it. There will be a folder named CSS. Just copy the entire folder into your workspace (the place where you just created the above HTML file).
Next, just reference the CSS stylesheet from your HTML page, by adding the following line of code to the head tag of your page.
<link rel="stylesheet" type="text/css" href="css/tooltipster.css" />
jQuery Tooltip Plugin
Now, our last and final job is to implement jQuery, and import the jQuery tooltip plugin on your webpage. First of all, copy the _jquery.tooltipster.min.js_ file from the js folder of the ZIP file that you just downloaded. Create a folder named js in your workspace, and paste it there. Next, we need to link this file and the jQuery file to our webpage. To do that, place the following code just before closing the body tag on your webpage. Note that you can also place this code in the head section of your website as well, but it would impact website loading time.
<script
  type="text/javascript"
  src="http://code.jquery.com/jquery-1.7.0.min.js"
></script>
<script type="text/javascript" src="js/jquery.tooltipster.min.js"></script>
<script>
  $(document).ready(function () {
    $("#top-tooltip").tooltipster({
      content: $(
        "<p>This is an example of a tooltip on the top of the element</p>"
      ),
      minWidth: 150,
      maxWidth: 150,
      position: "top",
    });
    $("#bottom-tooltip").tooltipster({
      content: $(
        "<p>This is an example of a tooltip on the bottom of the element</p>"
      ),
      minWidth: 250,
      maxWidth: 250,
      position: "bottom",
    });
  });
</script>
In the above mentioned code, I have set the minWidth and maxWidth parameters of the tooltip to get a fixed width tooltip. You can change these values as you like, and the position parameter just defines the position of the tooltip, top or bottom. There are a lot more parameters that you can specify. Check the official plugin page for those parameters.
Well, that’s it. You just created yourself a good looking jQuery tooltip. Go ahead and share this tutorial with your friends and let them know about it as well. Don’t forget to subscribe to Slash Coding for latest post updates via RSS Feeds, Facebook, Google+ or Twitter.